Monday, February 21, 2011

What I made Monday! Overalls overhaul

So, I may be the only mom that experiences this (almost daily), but it seems like my child always looks a bit like a hot mess ragamuffin. I buy her clothes- new clothes- and they're super cute, but then we get them on her and she wears them for about 10 minutes and things go downhill. SHE WON'T STOP GROWING. Ugh. Kids these days! Right before I left to pick up my mom from the airport and head off on our road trip, Finley decided she needed overalls. She said that she "knows they make them as dresses" which means, don't even try to buy me a regular pair and tell me they didn't have the kind with the skirt. So, our roadtrip suddenly involved a hunt for an overall dress. We scored pretty quickly at a Tommy Hilfiger kids outlet. $22, which is more than I'd like to spend on overalls, but I didn't want to spend our whole trip hunting for overalls, so I snatched them up. However, when I returned home and she tried them on, they were RIDICULOUSLY short. They're a 4T. Really Tommy?? Really?? Who do you use to size your clothing??
Of course I forgot to take a before picture (one day I'll remember!), but here's an *almost* before picture:


 And on the reluctant model (with leggings because I'm a family friendly blogger like that):

They barely covered the top half of her tush with the ruffle intact. And of course she loved them and wanted to wear them every day. Everywhere. Eeeeeeegosh.  So I needed to make them longer.  I looked allover for a tutorial and couldn't find one, so I just decided to wing it. If you have an old pair of overalls, you'd like to overhaul or just a pair you'd like to make longer, maybe this will help!
So, first I removed the existing tiny ruffle.
I cut a piece of base fabric a little wider than the bottom of the skirt and long enough to cover her tush. Then I cut three pieces of fabric wider than the width of the base fabric. I actually am super lazy and just cut the fabric the width that it came on the ream. Each piece of fabric is folded in half in the pictures (because you have to have a front and back- having just a front wouldn't solve the tush exposure problem).

Then I hemmed the bottom of each ruffle piece by folding up an 1/8-1/4 of an inch and ironing, then folding and ironing again.

See? It's folded twice so there won't be any exposed raw edges.
Then I zigzagged along the top because I don't have a serger, followed by a straight stitch along the top with a longer than default stitch- I used a 4, my default is 2.5. I ruffled each layer slightly by pulling the bobbin thread and lined up my first piece face down, raw edge to edge and sewed them together.
Wyatt helped.
Then I folded it over, ironed flat, and top-stitched.
 Then I did the same thing with the second row, marking with pins where I wanted it placed- about 2.5 inches above the bottom row. This will depend on how large your ruffles are, but you want to make sure you place it low enough that you don't have a gap between ruffles, but high enough that you don't completely cover the bottom ruffle.

For the top ruffle, I didn't bother folding over and sewing because this part is attaching to the overalls. So just pin in place and sew a straight stitch.
 Now fold in half and sew right sides together to make a skirt then pin skirt around bottom of overalls right sides together.
 Then zigzag around the seam and trim excess fabric.
 Then flip down and iron flat, and top-stitch.

Voila!

Isn't she just lovely??
And shy.


Overalls are good for climbing...

And pretending to snowboard...

And for being just plain cute.

How much do I love her?? "THIS MUCH!!!!!!"


Wednesday, February 9, 2011

This is the year the Bakers get it together. Step 1: Organize my craft stash


This is it y'all. This is the year. This is the year that the Bakers get it together. I'm not a fan of new year's resolutions or anything, (and it's February, so it's a little late anyways) but we have got a problem: EXCESS. And Mess. And chaos. A while back, I got this forward in my email. One of those powerpoint presentations set to overly dramatic music that usually goes straight to the trash bin because the presentation of it all just irks me (I know, I'm heartless). But this one was about the perfect symmetry of the bible. If you have no clue what I'm talking about, here it is.  In a nutshell, The Divine Providence of God is on full display throughout all history and in the pages of the Holy Scriptures. The beautiful order and symmetry that God displays speaks loudly to the veracity of the Word of God and His direct involvement in the affairs of His creation. Seriously, check out the article. Anyhow, God is a God of symmetry, order, purpose. He is not a God of chaos, so it makes sense that we are uncomfortable and stressed when we are living in chaos. So, yeah, we're working on becoming less, well, chaotic. First project: the craft stash. 
The closet in the family room/fireplace room/skylight room, whatever you want to call it, is home to my crafts and since we've moved in it has also housed tools, Christmas decorations, Shannon's uniforms, whatever. It's like that junk drawer in your kitchen, but it's an ENTIRE CLOSET. I'm not kidding. I couldn't ever find anything I need, it was always a mess. It got to the point that when I'd hear a crashing sound in the house, I wouldn't even flinch because I knew it was coming from the craft closet. I should have taken a before picture, but I forgot! I know, I know. But I remembered after I was almost done removing every. single. thing. from the closet. 

 You can't even see it all in these pictures, but you get the idea. And the kids were kind enough to help.
 Aren't they sweet? Anyhow, I took a whole day of sorting through, organizing like with like, downsizing, and bagging up items that we don't need for donation. I was pretty panicked throughout the day and I may or may not have even cried at one point. The task became much more complicated when I decided I couldn't stand the dingy white walls that were all marked up. And the "shelving" consisted of long boards propped up at both ends with zero center support. Well, there was one little L that was- wait for it- 2 ENTIRE INCHES BELOW THE SHELF. Yep, that was pretty much useless. Anyhow, I painted, installed center supports, painted some more and then methodically placed everything in it's own place. Including a desk and a chair, which, when tucked in where it belongs, are all hidden behind the closet doors. 


It's fantastic if I do say so myself. Now I can leave my sewing machine out in it's place- no more cluttering up the dining room table :) And aren't the fabrics pretty all folded up there- bonus is that I can SEE what fabric I have. Same for the ribbon on rods instead of in a drawer, and all my other stuff in glass jars for visability! Yea!
So, there's your motivation people- go clean out a closet! It feels good!!

Saturday, January 22, 2011

princesses, cake and a mind freak moment


One of my good friends, M, had a birthday party for her daughter today. Her birthday was actually in September, but we celebrated in January because, well, we did. We celebrated M's birthday in September, and it's actually in November, so I'm thinking she just likes to mix things up ;) Anyhoo, she had a princess tea party and the Fin and I had a ton of fun getting her ready this morning. She picked out her favorite princess dress, we curled her hair, put on make up, even some glitter. Don't worry, I didn't go overboard. See??
You can't even tell she's wearing any makeup, but she certainly felt special. And yes, it's winter and she's wearing tiny straps. I did make her wear a cardigan but she refused to keep it on. It covered up her beautiful dress, and we just can't have that!
I also made the mistake of asking her what I should wear. Um, yeah, we ended up compromising and I wore a tea length black dress with strappy heels. In January. It was snowing during the party. I was a bit cold, but she thought it was great, so whatever. I would insert my picture here, but I was behind the camera. But believe me, there were princesses:

I took another shot at cake decorating and had way too much fun playing with fondant. I made a few flowers, then polka dots:
And then some more flowers, until I didn't know what to do with them, so they just kind of landed on this cake:
And around the cake:


Working with marshmallow fondant is super fun. It's like play-doh, but it tastes better. And you don't get those strange looks when you eat it. Not that anyone was watching me in my kitchen at midnight, but you know what I mean.

And here's for the mindfreak moment. I'm new to blogging and haven't really invested much research or time into it because, really, I don't have a ton of time to spare in this season of my life, but I see alot of people with cute signatures after their posts, so I decided to grab one. Here it is:
See? Cute, right? Well, I made it at this website where you type in your name and it brings up a hundred different signatures and you just right click and save. Well, you know when you look at a word too hard and it starts to look funny. A simple word like "and". And you begin to second guess yourself. Is "and" really spelled A-N-D?? How else would it be spelled?? But if that's right, why does it look so weird. You find yourself sounding out one of the first words you learned to spell. You know, back in KINDERGARTEN!! Anyhow, I had that mindfreak moment with my own name today. Yep, my. own. name. Ryanne. RYANNE. R-Y-A-N-N-E. The frustrating part is my name isn't spelled like it sounds (it's just "RYAN") so I was seriously weirding out for a minute. I checked my government issued IDs. It's Ryanne. We're good.
Hope y'all are having a great weekend!

Friday, January 21, 2011

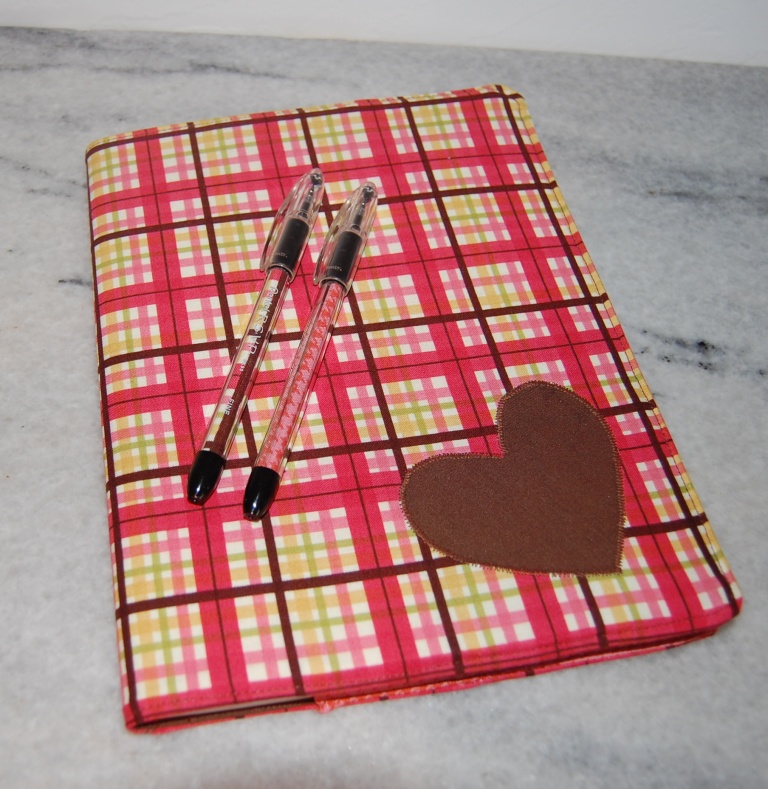
What I made Monday- Fabric covered journal and matching pens!


Hi  y'all! Welcome to "what I made Monday". On Friday. Cuz that's how I roll. I made it on Monday, or maybe it was Wednesday ("what I made Wednesday" still works) but things are chaotic pleasantly busy around here, so I'm just now getting around to posting. I had big plans of making a bunch of journals to send with the super lovely woman that leads our bible study on her trip to Russia, but, as always, I overestimated my ability to actually make it happen. But I made one! And hopefully I can make a few more before Monday. I can do it, right?? Yep, it's happening. Anyhoo- I picked up about 30 of these generic composition books back in September for 5 or 10 cents a piece after the back to school rush. My friend Jen, has a super cute fabric covered prayer journal, and I thought it would be a fantastic craft for MOPS, so I got a bunch. But now I'm not doing MOPS anymore, so I just have a ton of journals... I google image searched (you know I loooooooove google image searching- until it goes horribly, horribly wrong) fabric covered journals and found one that I really liked at By Small Means- she has a great tutorial that is super easy to follow. Of course I didn't have all the supplies, so I did it a little differently, but I think it turned out pretty cute.

Tuesday, January 18, 2011

The Beast is in the house!

This has been the longest project ever thanks to some very uncooperative weather, but I'm so relieved to finally say: The beast is in the house! Hoorah! So, for anyone who cares how it turned out, here she is-


Apparently I'm a horrible photographer, or this just isn't what you would call "heavy distressing" because you can hardly tell it's distressed unless you look at it close up. 
I pretty much love it. Wyatt and The Fin can't reach the tv- you know what that means?? NO MORE FINGERPRINTS ON THE TV!!!!! And... the drawers are childlockable. I'm superpsyched about this. This was my life before:
 Always open and a mess, thanks to this guy:
Our old tv stand was see-through, which I disliked, and Wyatt the great houdini kid could get into every type of child lock we tried on this thing. I'm pretty excited that I will be able to hide our dvds and equipment and that Wyatt won't be able to make such a mess. I'm also pretty excited that something this ugly:
could turn out this attractive:
YEA!!! 
Oh, and for those of you that inquired on facecrack- I don't know if I'm doing it right, but I've just been sanding the furniture down to get rid of the varnish (there is also varnish remover chemical for the more difficult finishes), prime it with a white primer (I used a rusty brown primer for the green tables), paint with the desired color, distress, and apply a satin polycoat.